
The first use of the Sol’ex is often confusing for beginners because several levels of adjustments can interfere and cause difficulties for the less experienced user. This page describes several scenarios that may arise. Once these first steps have been taken, the user is quickly launched and can progress alone.
01 – The slit, the sensor and the ROI: optimal position.
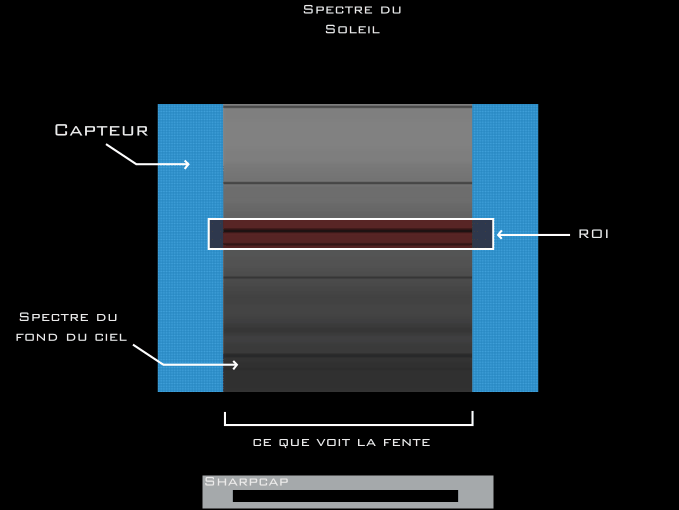
Fig. 01 optimal optical alignment for an instrument focal length < 450mm.
At the beginning, to clearly understand the placement of the image of the slit on the sensor, we can advise you to make a ROI (Region Of Interest) whose width is the entire sensor to get your bearings clearly. Sometimes it is even better just for the time of the first calibration, not to make a ROI to start with the largest possible view. We then try to see the spectrum of the background of the sky by increasing the gain and the exposure time. (you must of course point the instrument towards the sky and if possible in good weather).
The benefit of making a ROI is twofold:
- it allows us to considerably reduce the size of the files because we only capture the part of the spectrum that interests us, such as the Ha line for example
- the capture zone being reduced, the frame/second rate rises towards the necessary values for the correct reconstruction of the image of the sun.
Here are the most common cases that can occur:
02 – Camera rotation.
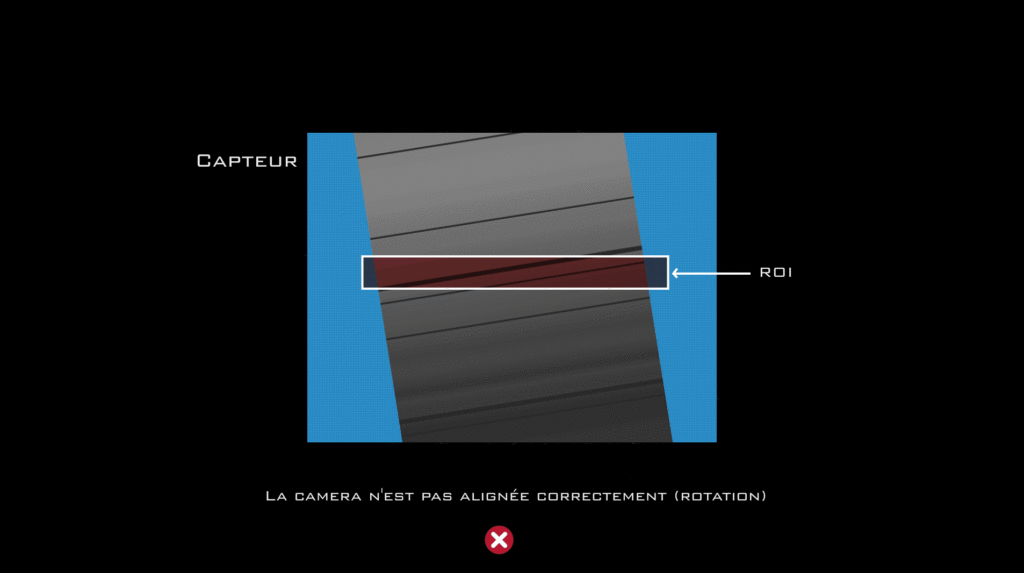
Fig. 02 camera orientation error.
Easy to solve, the camera is simply not well oriented. You have to turn it in the Sol’Ex until the image of the slit appears vertical.
.
03 – Alignment Slit/Grating.
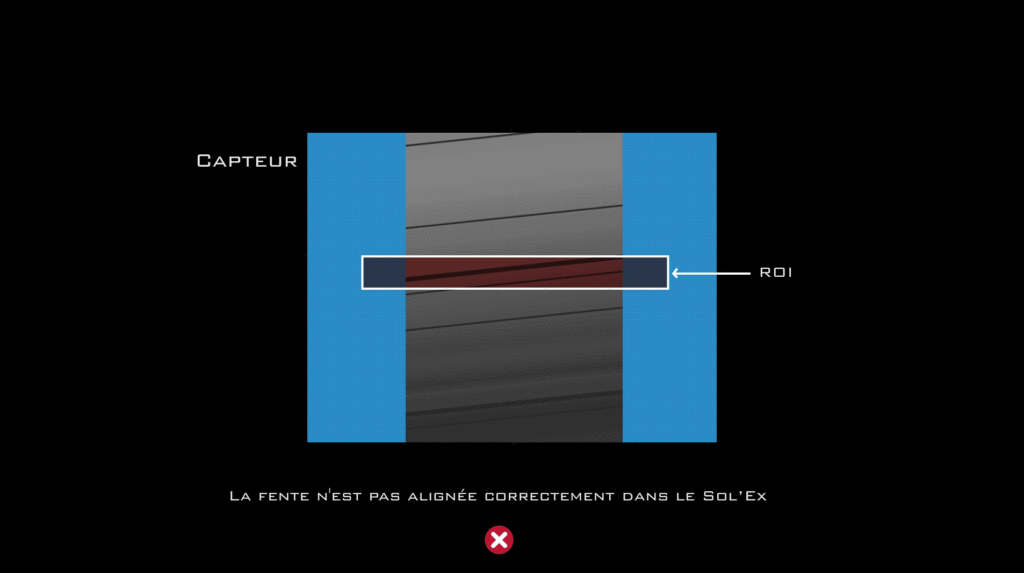
Fig. 03 slit orientation error.
Here it is the slot and the grating which are poorly adjusted to each other. We can slightly modify the orientation of the slit. until the lines are perpendicular to the edges of the slit.
.
04 – Offscreen slit.
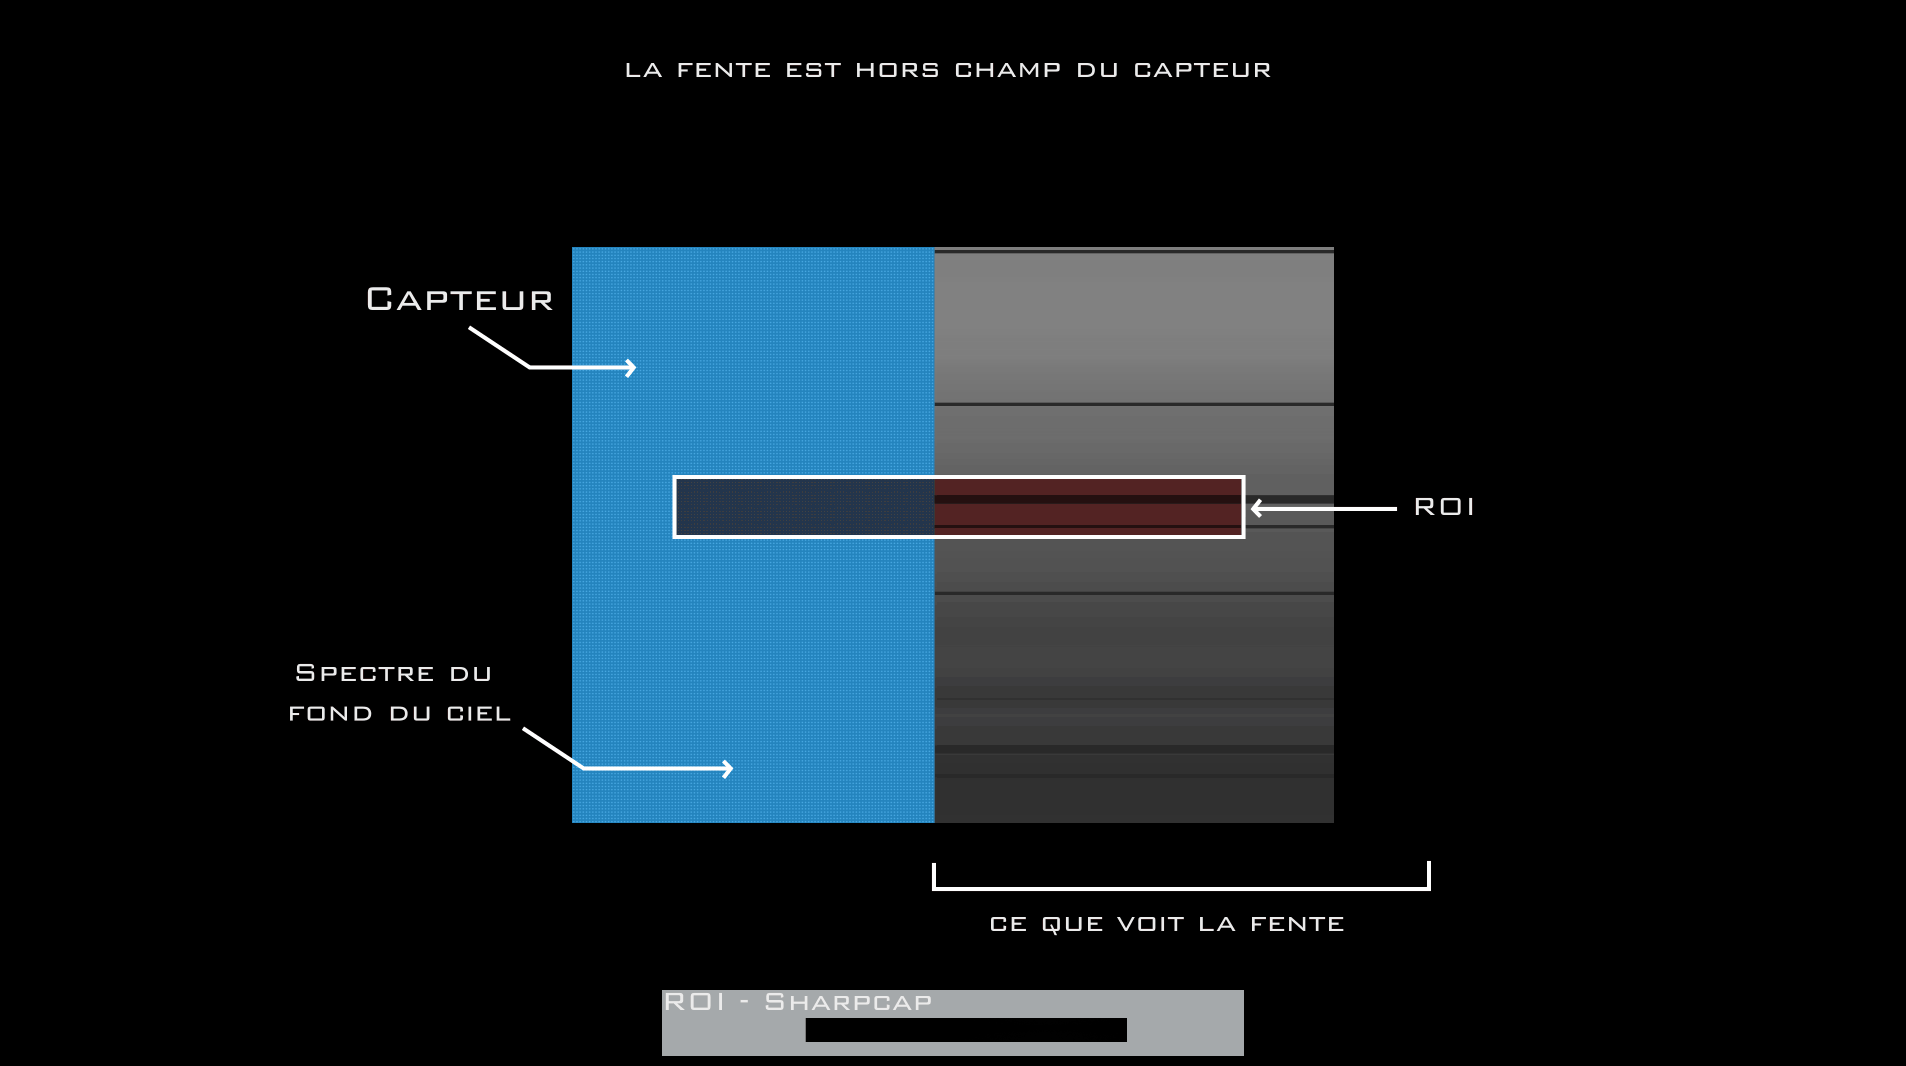
Fig. 04 Grating misdirection.
It often happens that the slit is offset. We then only see one of its two ends. This indicates a grating misalignment. By loosening the screws of the Sol’Ex wheel we can play on the perpendicularity of the axis of the grating and thus realign to be well centered on the sensor until we see the 2 ends of the slit or at least the spectrum of the background of the sky over the entire width depending on the sensor used (block if necessary with thin layers of paper at the level of the screws). Indeed if the focal length of the optics is limited to fit in the slit (450mm) then part of the sun will be cut off by the edge of the sensor if the slit is not correctly centered on it.
.
05 – Sun off-slit view.
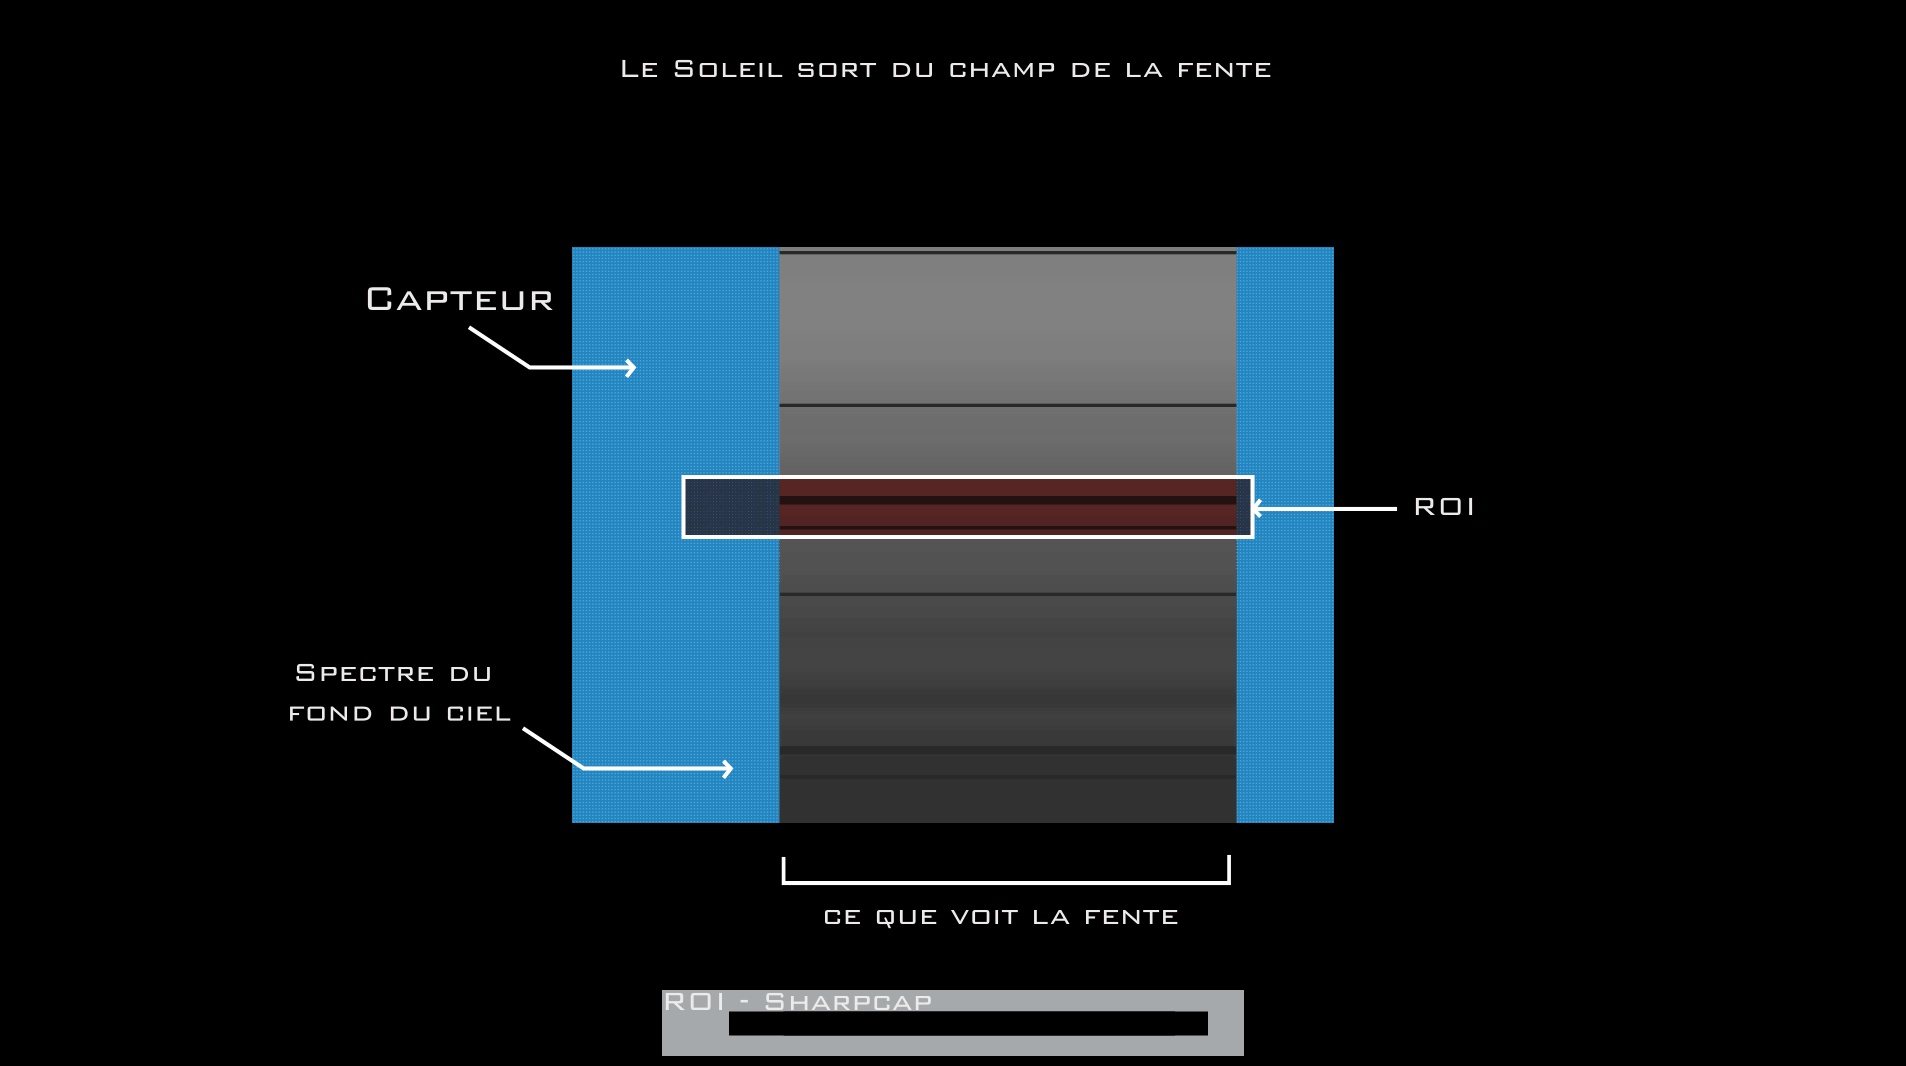
Fig. 05 sun framing error.
The sun may appear centered on the sensor but due to its strong luminosity, we do not necessarily notice, as here, that the image of the slit may be shifted on the sensor. See point 08 to see this (increase the gain to ensure the slot is centered). So we start by recentering the slit as in case 04 then we recenter the sun (when it is as wide as possible).
.
06 – Offscreen ROI.
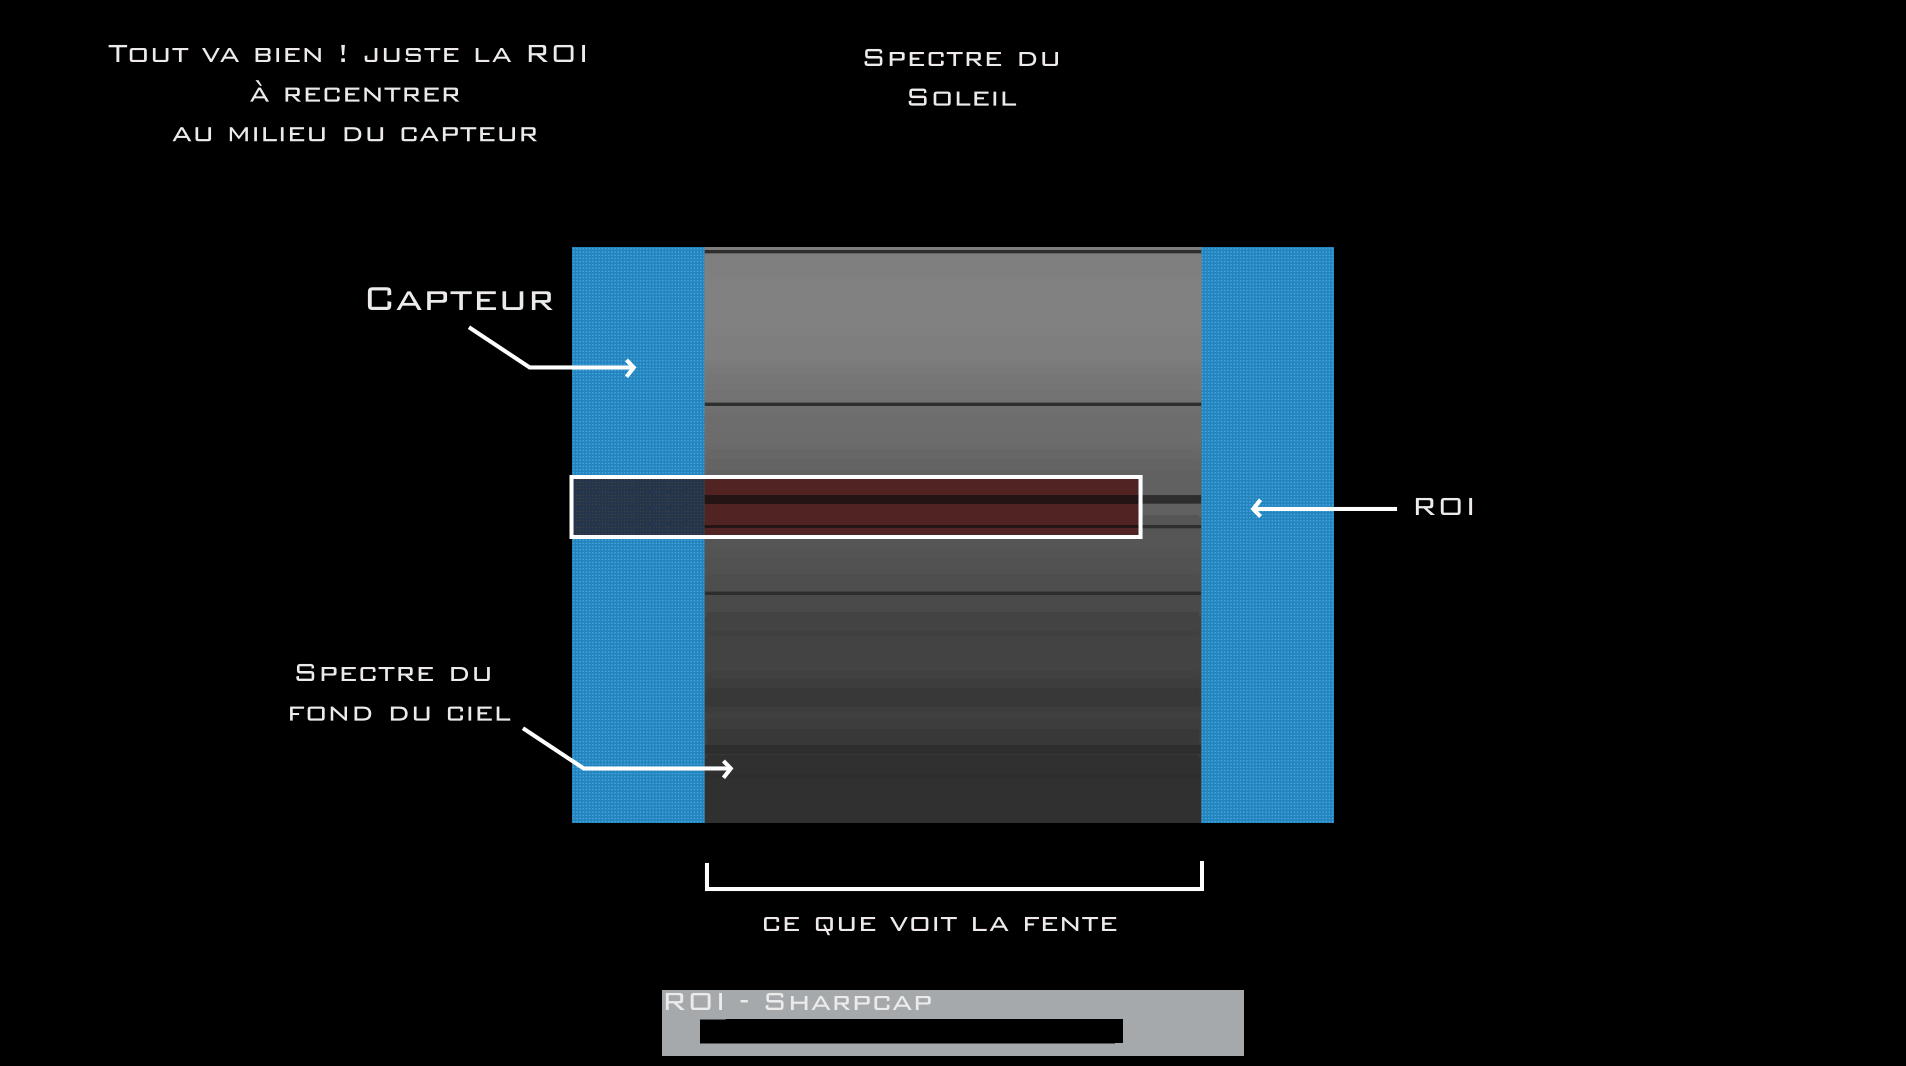
Fig. 06 Wrong ROI creation/placement.
Make sure that the ROI is well centered right/left on the sensor so as not to confuse it with the problem of an offset slit (point no. 04).
.
07 – Tilt
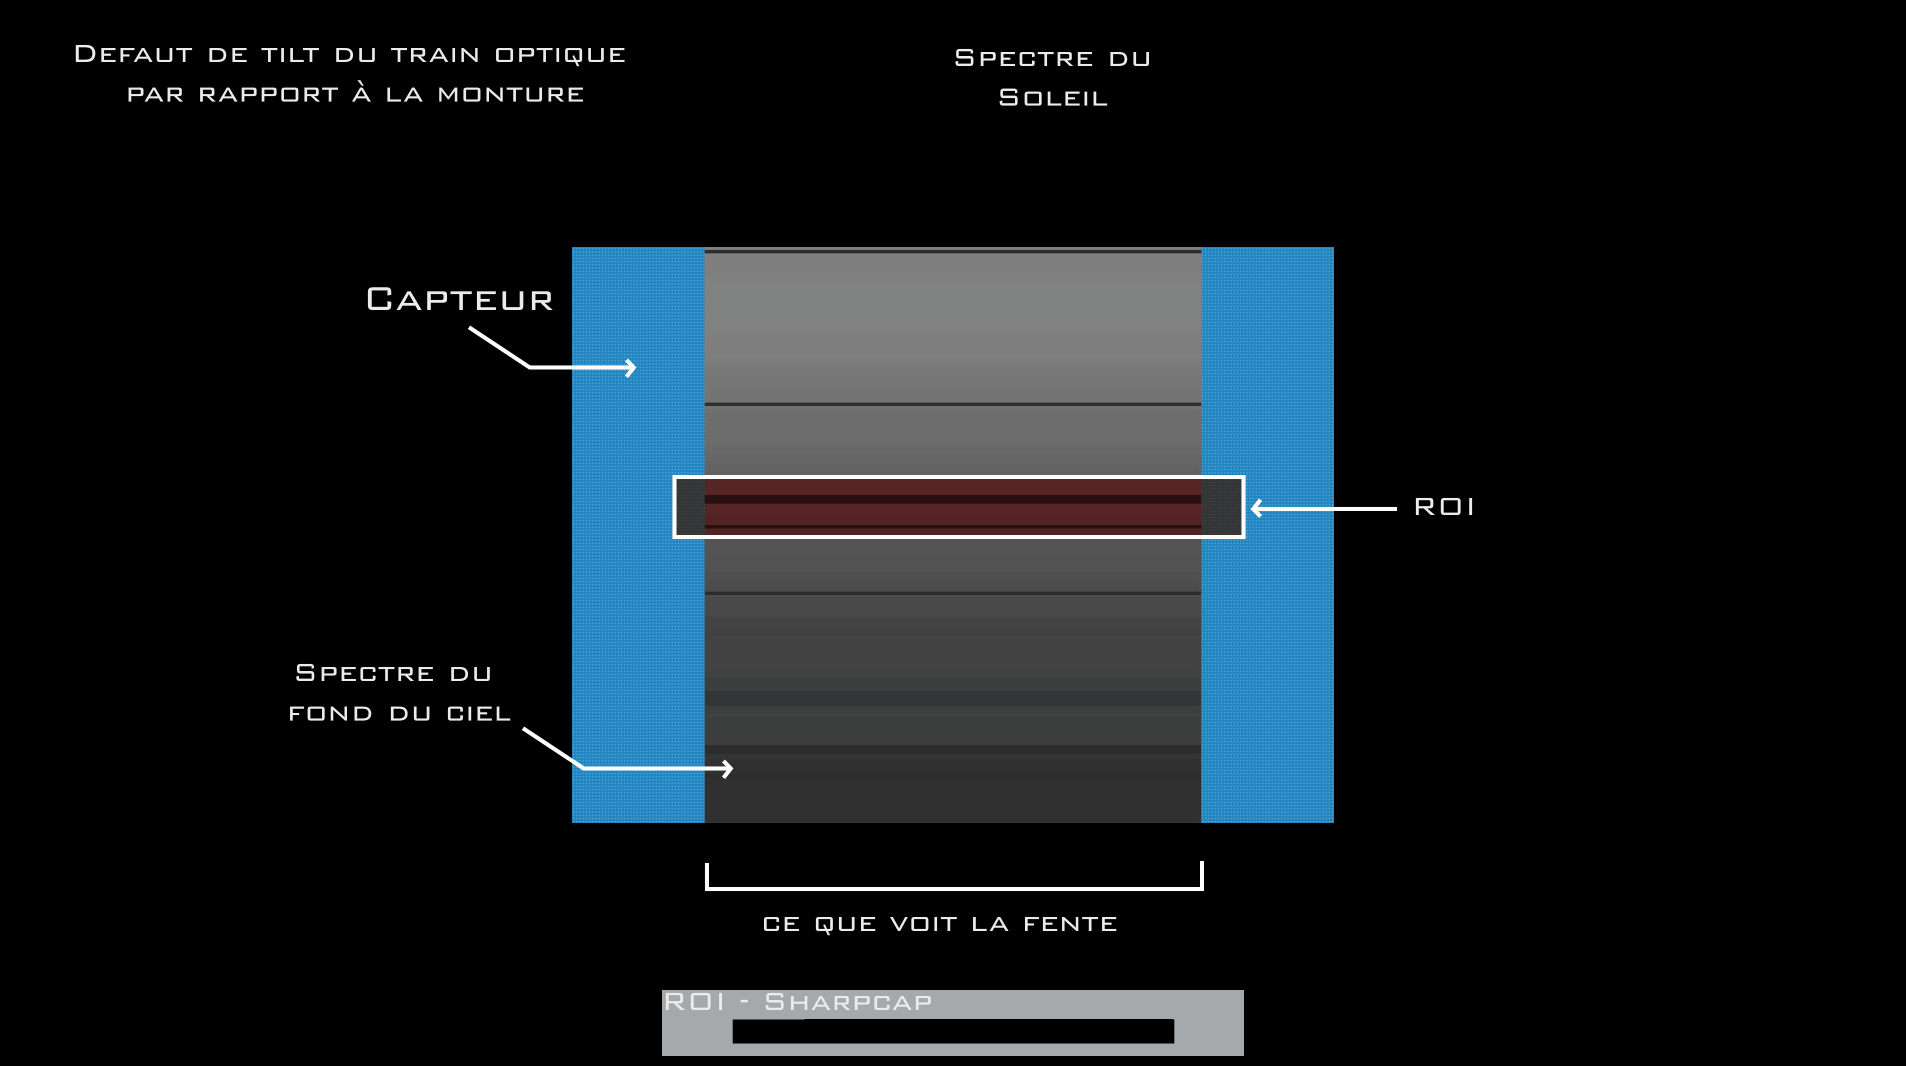
Fig. 07 Tilt issue.
During the scan, the sun can appear and disappear in 2 different places instead of just one during the scan, we then speak of “tilt” the degree of which is calculated and displayed in the console of the INTI reconstruction software. In fact, instead of crossing the slot perpendicular to it, the trajectory is made diagonally. To correct this problem, the entire optical unit ‘instrument + Sol’Ex + Camera’ must be rotated as one body on its axis in relation to the mount by as many degrees as calculated.
.
08 – Overexpose to get your bearings.

Fig. 08 overexpose to get your bearings.
To get your bearings at the beginning, it is recommended to temporarily overexpose the sensor in order to clearly distinguish the position of the slit on the sensor. this is what will allow us to check in which situation we find ourselves in relation to the situations described above. This can also be done on recorded SER files when looking to analyze a problem encountered a posteriori.
.
09 – Capture camera focus.
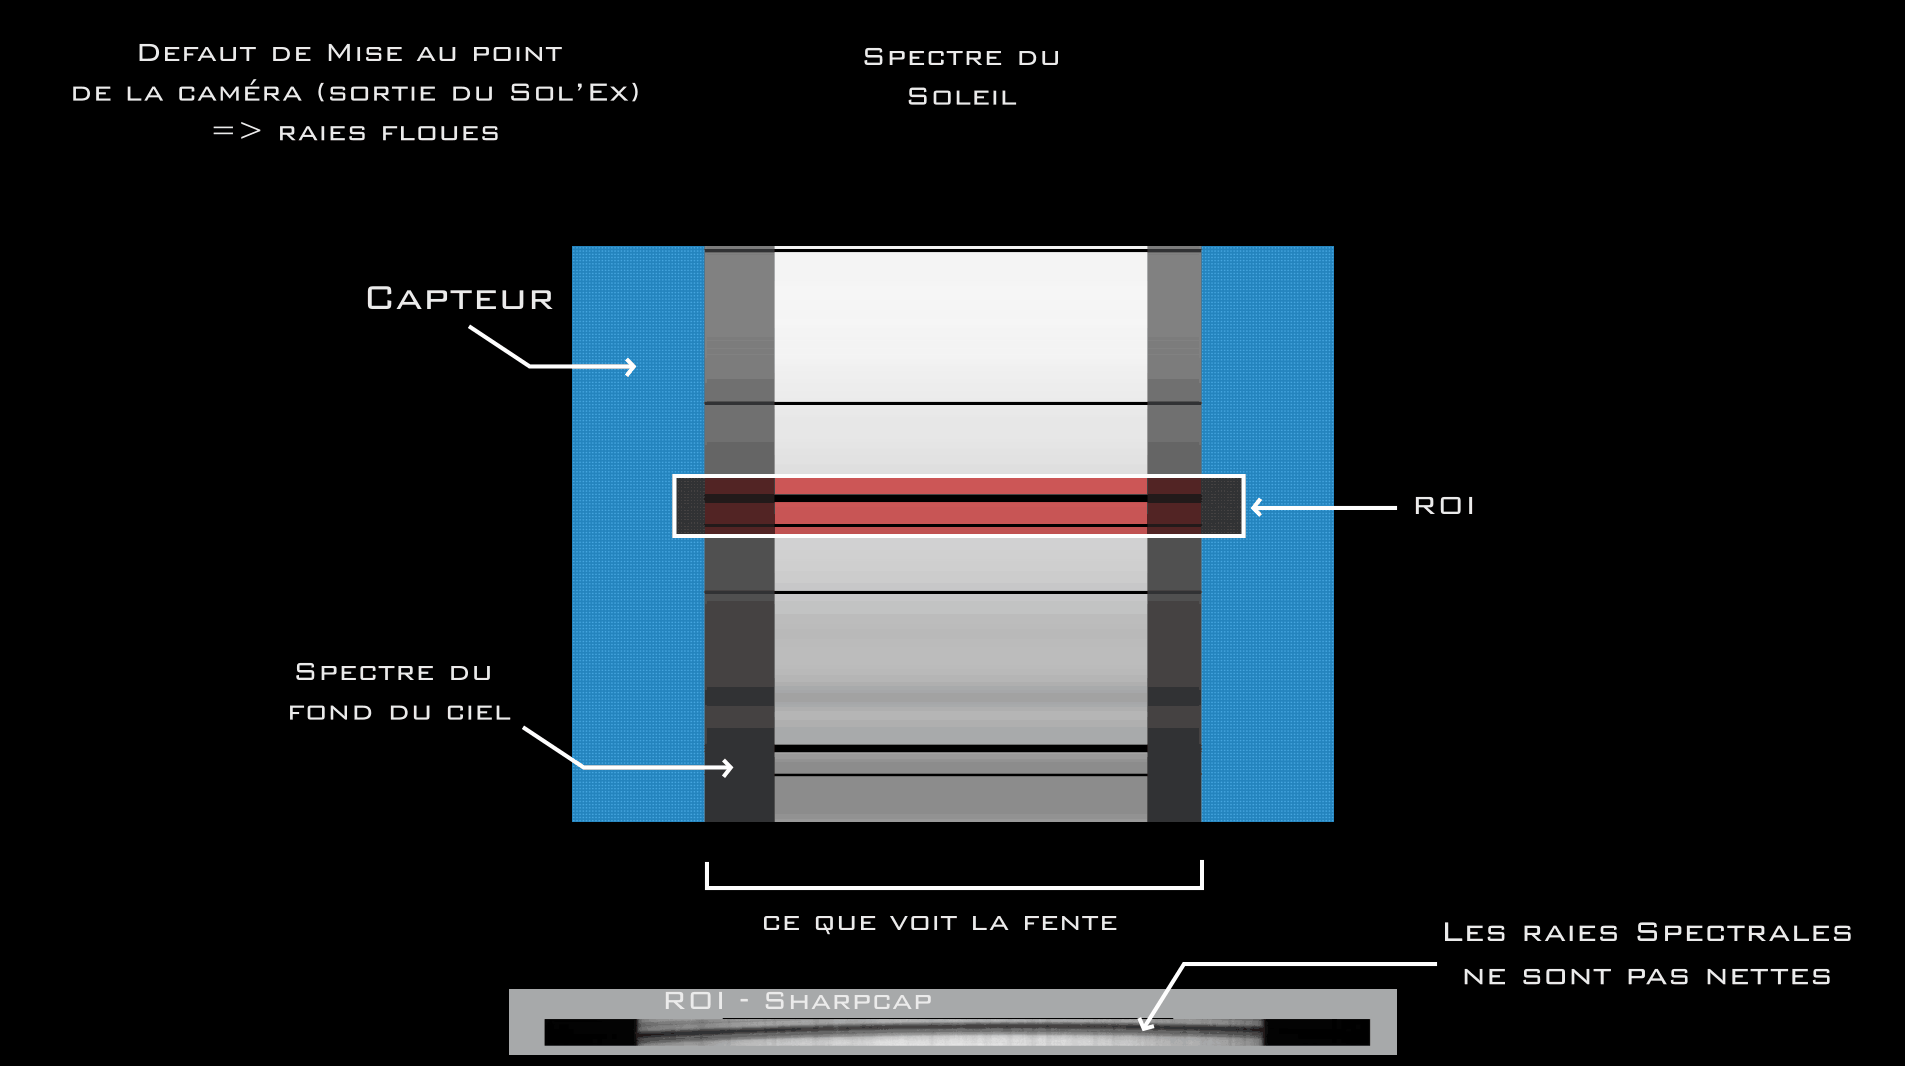
Fig. 09 out of focus of the capture camera.
The capture camera must be finely adjusted, especially if you change the targeted spectral line with the Sol’Ex wheel. Zoom into the capture window to see clearly and adjust the focus using the helical focuser until you can distinguish the finest lines.
.
10 – Focusing the Scope.
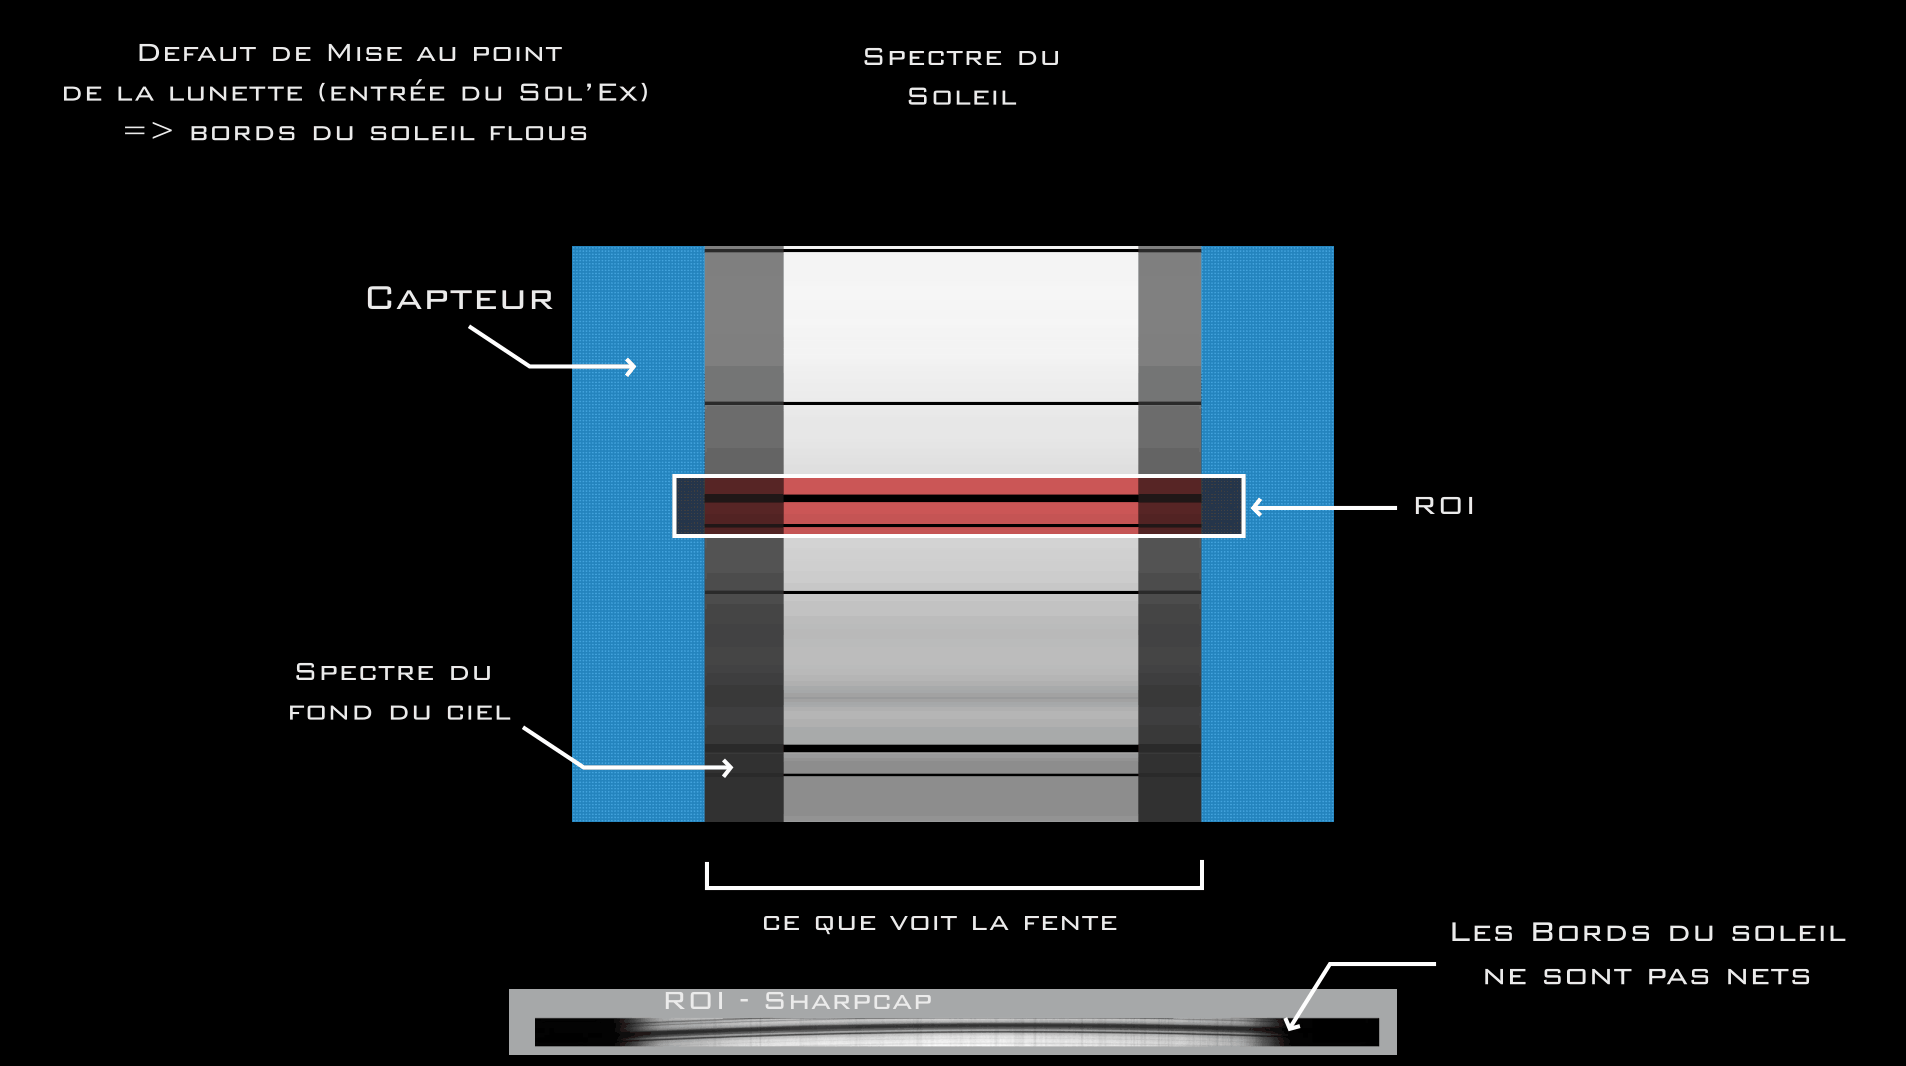
Fig. 10 optical instrument out of focus.
To correctly adjust the focus of the optical instrument, the telescope for example, you must use the focusing system of the latter until you obtain very sharp edges of the sun. You can zoom in the capture window on one of the edges and increase the gain temporarily during the adjustment to clearly see what you are doing. A “tingling” feeling on the Ha line when scanning is a good indication of correct focus.
.
11 – Slit/lens distance adjustment.
If it is not possible to adjust both the sharpness of the edges and that of the lines, the adjustment of one affecting the other, it is likely that it will be necessary to optimize the slit/lens distance using the screws provided for this. effect on the body of Sol’Ex. This adjustment can already be adjusted by placing it on the zero order to obtain a perfectly fine and sharp slit.
.
12 – Just one blurry edge?
It sometimes happens that one edge of the sun is blurry while the other is sharp and vice versa. This may be due to a lack of perpendicularity of the optical elements in relation to the incident light, for example if the entire instrument is not well aligned with the mount.
.
13 – Advice.
- Position yourself on the center of the sun to have the widest part possible to fix this sensor/slit/sun problem.
- Read the tilt value returned by INTI to properly correct the rotation of the optical train.
- Overexpose as soon as you have a doubt to check.
- For a standard Asi178 type camera + 400mm focal length + 16ND filter we are within 10ms exposure and gain around 100. If ever you need 1000ms and 500 of gain to see the spectral lines appear, it is probably because you are not on the sun but on the background light of the sky. Correct exposition is more likely around 10ms and 50 gain.